bog design

Tuesday, October 30, 2012

Red Ribbon Week Door Decorations

It is so hard to come up with something original, but I came up with this idea all by my little self!  I knew I wanted to do something related to Halloween, but what?  I finally decided on something witchy.  Then it came to me "Drugs are wicked bad".  I loved it!  I let the kiddos make their own witch hat (no template here) so it would be more personal.  They decorated their hat.  Then they traced their hat onto lined paper, cut it out, and wrote about why they are too busy to do drugs. I put the words on using black letters except for "wicked" I used purple letters with little gold stars (sorry it is so hard to see in the pic).   I added the cutest little witch's broom covered in purple glitter and a black bow and two witch decorations from the dollar store with lots of purple streamers.  The students enjoyed the project and we won the contest!


Drugs are Wicked Bad!


Their witch hats are too cute!

Happy teaching!

Friday, October 5, 2012

Top 10 Fav's in My Room

How much do we love decorating our rooms?   You will be able to tell really quickly that my room theme is Safari. I am constantly looking for things  that are not only decorative but that function well.   I can't even imagine what my room would look like without Pintrest.  So many of the things I do are inspired by all of you teacher bloggers and all the ingenious ideas posted on Pintrest.  So, here are my top 10 favorites!

1.  C.R.A.F.T. Bulletin Board


These were from 


I love her stuff!  


2.  Daily 5 Choice Board


I got these from 

Actually, I got them from her TPT store, but she has sooo much great stuff on the Daily 5 that I had to share her blog link.  I wrote the students numbers on flower petals and then put self-adhesive Velcro on the back.  It is a really easy way for the students to move them through the choices.  And yes, this is more of the $2.50 vinyl I bought at Wal-Mart that you will see in the project below.  I can't believe I got two projects out of this one piece of vinyl!


3.  Milk Crate Bench


The dual purpose of seating and storage is awesome!  My students love this and the best part is the vinyl I used for the cushion was on clearance for $2.50 at Walmart!!!  Here is the one that gave me the inspiration to give it a try.  


4.  Door Decorations
I love my door decorations this year.  I had the Toucan and knew I needed to come up with a clever saying. I thought this was kind of cute.  What do you think?  


5.  Top Banana Board

Every week I choose a student to be our "Top Banana".  I use this board to display pictures they bring from home and some of their favorites.  I put contact paper over the paper so I can use sticky tack on the back of the pictures.  That way it doesn't damage the pictures that I send back home and the contact paper keeps the grease from the sticky tack from staining my paper.  (Side note - the contact paper doesn't normally look this shiny - read yucky - this is just a reflection of the flash.)


6.  Class Library

I spent so much time making book bin labels and book stickers for my whole library this summer.  I put a sticker on every single book I own (with some help from my sister).  It wasn't until I was done that I saw that TPT had some great sets.  Oh well!  I still love my library and how much easier it is for the students to put the books back in the right place.  I love my little tiki hut!  I also made a book hospital which has worked out great.  Now they know not to interrupt me to tell me there is a little tear on page 54.  They just put it in the book hospital and I get to it when I have time.


Don't you love the giraffe with the nurses hat I glued on?
My inspiration:


7.  Writing Process Bulletin Board


8.  Writing Process Clip Board


My inspiration


9.  Clock

I was so excited when I found these numbers to go around the clock.  I just printed them on dark green paper.  Loving it and so handy!


My inspiration

How great is Amy Lemons!  Ah-maz-ing!


10.  My Safari Theme

I am really enjoying this theme.  It is kid friendly, yet kind of glam too!


Well that's my top ten!  What's yours?


Tuesday, October 2, 2012

Constitution Week Ideas

As we all know, we never really take a break from teaching.  We are always thinking about our kiddos and new exciting ways to impart knowledge.  While on vacation in Boston this summer, I got very excited about all the history that makes this city so special.  I knew I had to buy something to take back to my class.  I decided to buy a "Make Your Own Constitution" kit.  It was the cutest thing.  It had parchment paper, a quill, an ink well, and "ink".  I also bought a copy of the our country's constitution.  I introduced the topic by presenting my copy of the constitution.  In an attempt to encourage some higher level thinking, I told my second graders that this was indeed the real constitution.  The conversation that ensued was comical, enlightening, and fun.  We finally determined that it could not be the real constitution, but they still thought it was a very cool copy.   Then I broke out the kit.  They were so excited you would have sworn I just told them I was giving them a million dollars...each.  We studied the constitution.  We took a day and just talked about the preamble.  We listened to and sang the School House Rock version too.  We took another day to study the articles and the signatures. I used the folllowing websites to help us:  http://www.usconstitution.net/constkidsK.html and http://www.scholastic.com/browse/collection.jsp?id=391 .

By the third day we were ready to talk about how the constitution is a living document and always changing.  Finally, we were ready to write our class constitution and (hopefully) understand what it means.  They were so exited to sign their document using the quill and ink well.  It seemed so authentic to them.  We now have a meaningful document to live and work by!


Sunday, September 23, 2012

Cute Fall Bulletin Board Idea!

I don't know about you, but I having been listening to so much about the Common Core that I could scream I feel very well informed.  We always do a mini-unit on apples in the fall.  I found this cute craftivity on Pintrest but couldn't find the source (sorry- if you are the original poster please let me know so I can give you credit!)  The students each received a paper plate then they cut two curved lines.  They colored the cut out pieces for the leaves and glued them on the apple core.  I loved this because the project has no waste!  I knew I wanted to display their work because they turned out so cute.  Then I thought about what cute caption I could come up with and this is what I did.  What do you think?  Very tongue in cheek, but I love it!


Let me know what ideas you have for fall bulletin boards!


Sunday, September 9, 2012


As promised here are some pics and descriptions of what I did in Writing Camp.  Being new to this whole blogging thing and with the start up of school, it took me longer than I would have liked, sorry!  Well here goes.  We met for five hours each day for five days.  At the end of the five days we had a showcase of the student's work.  It was a wonderful way to end so the students could show off what they had worked on all week.  It was 94 degrees and incredibly humid, but the students and the parents were so happy to be there.  We started each day with a movement activity that would be used as a writing prompt.  We would break them up into tribes then give them an activity that they could work on as a group.  Thanks to a great idea one of my colleagues had, the first day of camp they received a large cardboard box that they could decorate to be their hut.  They loved this!   Then they had a choice of writing a narrative about the experience of decorating their hut, or a creative piece as if they were really living in the hut.  We would always have time for sharing and for complimenting each other's writing.  Then we would make suggestions for future writing.


Did I mention how much they loved making their huts?

One of the other activities was to decorate a shower curtain with a "scene" to surround their hut.  I think they liked this as much if not more than decorating their huts.  I had seen the idea to use a dollar store shower curtain for large projects on Pintrest and it worked really well.  The only advice I would give you is to make sure you use Sharpies or some kind of permanent markers.  The Crayola markers did rub off if you touched it.  I was amazed at how creative they were with their shower curtains and as we all know, once those creative juices were flowing it was incredible how that changed their writing.


I only wish you could see the big smiles on their faces!


Here is one finished project.  It looked really incredibly neat in person.
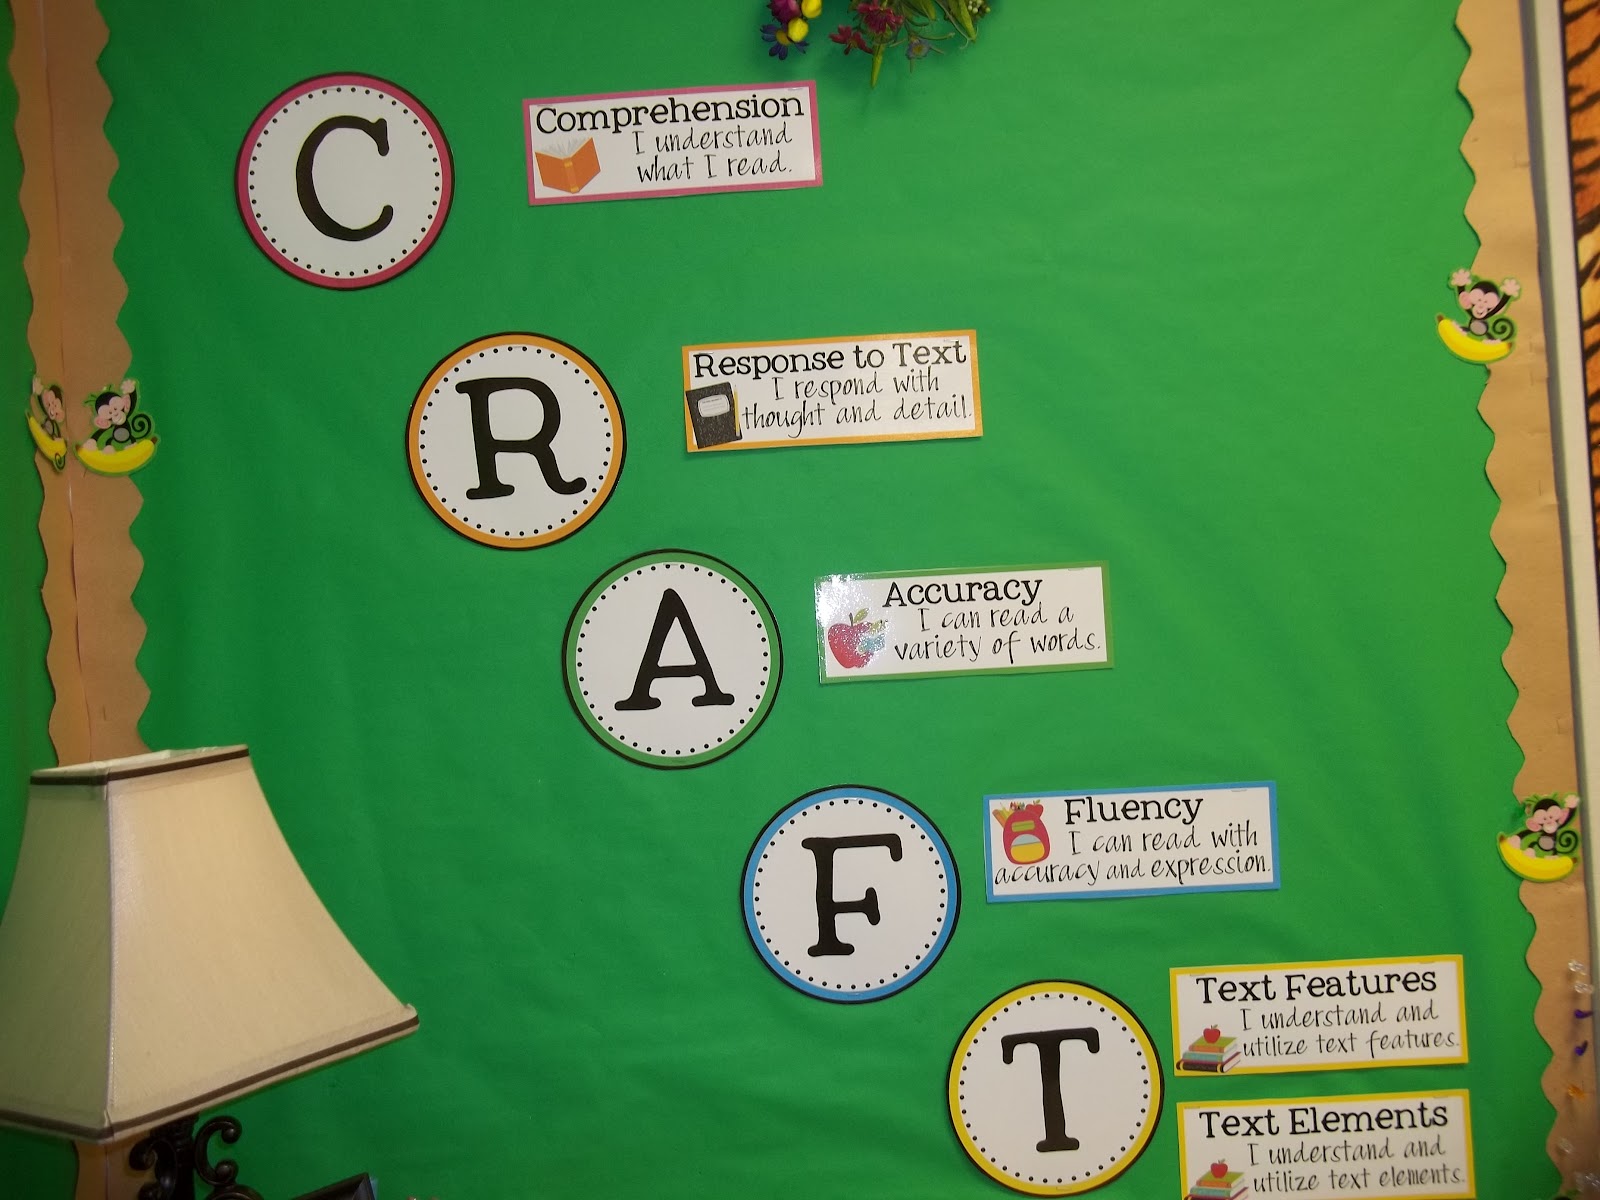
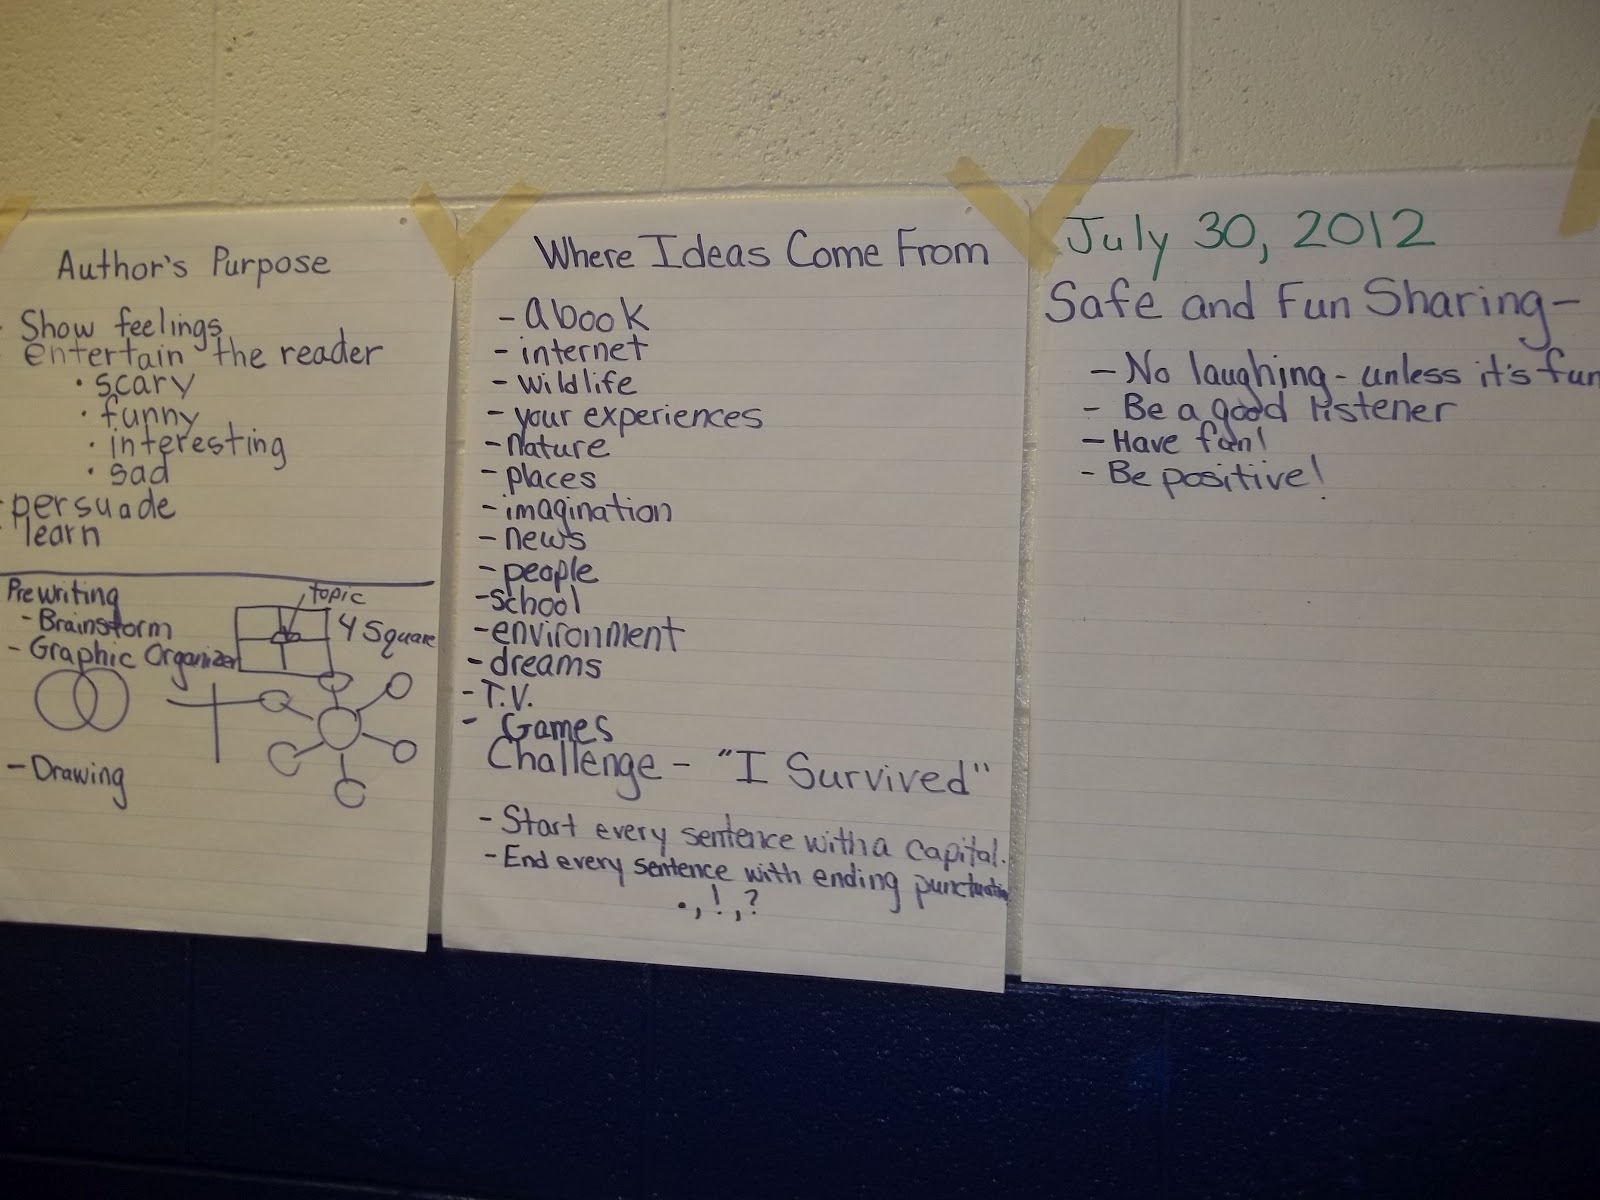
After their activity, we would meet at our learning area for a Writing Workshop.  We covered many different topics and made an anchor chart for each.  We posted the anchor charts so we could refer back to them throughout the week.

I made these palm trees out of an empty carpet roll from Lowe's that they cut in half for me and gave to me for FREE!! (Insert me doing my happy dance) Then I covered the bottoms with brown lunch bags scrunched (sorry for the technical term) on  The palm fronds are made from construction paper and  umbrellas.  I made these a couple of years ago, so I don't have a tutorial and I don't remember where I got the idea.  They matched my Survivor theme perfectly though!

They really enjoyed the workshop time.
We covered many topics such as where ideas come from; author's purpose; safe sharing; beginning, middle, and end; and how to write dialog.

I decided that a great way to teach dialog is by using knock, knock jokes and letting them write a puppet show.  They had so much fun with this.  After a mini-lesson on writing dialog, they had to follow a certain format to make sure they were writing the dialog correctly.   Because there was so much repetition, it helped them assimilate and retain the correct procedure.  Then  they got to perform their puppet shows and knock, knock jokes.  This was too funny! 


They had to complete writing challenges as a tribe each day.  If they completed their challenge they received one log.  After they received three logs they got a flame.  This really helped motivate them.  One of the challenges was to come up with an overused word and create a tombstone so it could "Rest In Peace."  They had to write the overused word on the tombstone along with some acceptable substitutes.  They did a great job on this and everyone completed the challenge.  


Too cute!

Another challenge was to create an envelope book.  I love this idea!  The pictures below are pretty self-explanatory.  It was the activity following our mini-lesson on expository writing.  

Front Cover

First Envelope


I used the multi-colored 3x5 index cards and folded them in half.  They had the illustration on the outside and the information on the inside.

Another great challenge( that I didn't get any pics of) was the project they did after the mini-lesson on beginning, middle, and end. I drew two lines on  an 8 1/2x11 sheet of paper the "tall" way making three sections. Then I copied the paper to make sure each camper had four sheets.  I put them together and stapled all three sections.   Then I had the students draw three different characters on right sides (ie a cowboy, an astronaut, and a dog or an alien, a ballerina, and a firefighter--you get the idea).  They had to make sure the head was in the first section, the body and arms in the second, and the legs and feet in the third.  Then in the left side they wrote the beginning, middle, and end of a story.  They turned out great and it really solidified this difficult concept for them.  

After an entire week of hard work and fun, we had a showcase on Friday afternoon.  We invited their families to see their final products.  Despite the heat, it was a huge success!  The students were so proud of their work and the families were very impressed.  I asked both the participants and the parents to complete a survey.  Imagine my surprise when the only negative comment was that the camp should be two weeks next year!  We'll see...

One of the camp participants shares his work.


Saturday, August 25, 2012

We all know how much our students struggle with writing.  It seems like the harder we work trying to teach writing, the less they enjoy it. I decided I wanted needed to find a way to show them writing can be fun.  I had taught summer writing in the past, and although it was successful, I still didn't feel like they realized how fun expressing themselves in writing can be.  That is when I thought of doing it as a camp. I had seventeen campers sign up for this adventure.  I love how my room theme inspires me, so I knew I needed a theme for the camp too.  I decided to go with a "Survivor" theme. I set up four tribes.   This allowed me to break them up into homogeneous groups for differentiated instruction.   We met for five consecutive days.  I was a little concerned that five hours each day might be too much for them, but the only negative comment I got on the evaluation sheets was that it should be longer!  We explored several different genres including narrative, fairy tales, dramatic, and informational.  We targeted specific skills such as brainstorming, getting through the writing process, plot, and word choice.  The campers came back more excited each day than the day before...you remember I said this is a writing camp, right?  So I guess I could say mission accomplished.  I am going to get all of the materials together and post pictures soon.  Now it is time to start thinking about getting my classroom ready.